Mục lục
- Mục lục
- Tổng quan
- Các thành phần của Jetpack Compose
- 1. Surface
- 2. Scaffold
- 3. TopAppBar
- 4. FloatingActionButton
- 5. Card
- 6. Box
- 7. Row
- 8. Column
- 9. Spacer
- 10. Text
- 11. TextButton
- 12. TextField
- 13. Button
- 14. Image
- 15. Icon
- 16. LazyColumn
- 17. LazyRow
- 18. LazyVerticalGrid
- 19. AlertDialog
- 20. CircularProgressIndicator
- 21. LinearProgressIndicator
- 22. CheckBox
- 23. RadioButton
- 24. Slider
- 25. Switch
- 26. SnackBar
- 27. Divider
- 28. DropDownMenu
- 1. Modifiers
- 2. remember
- 3. rememberSaveable
- 4. animateContentSize
- 5. Shape
- Live Preview
- Example App
- Free Resources
- Ứng dụng được xây dựng bằng Compose
- Tổng kết

Tổng quan
Tại Google I/O 2019, Google đã giới thiệu Jetpack Compose. Cùng với đó, Android Studio 4.0 (phiên bản thử nghiệm) cũng đã hỗ trợ phát triển ứng dụng sử dụng Jetpack Compose.
Jetpack Compose là một bộ công cụ hiện đại, được khuyên dùng cho Android để xây dựng giao diện người dùng gốc (native). Công cụ này đơn giản hoá và đẩy nhanh quá trình phát triển giao diện người dùng trên Android. Nhanh chóng đưa ứng dụng vào hoạt động với mã ngắn gọn hơn, các công cụ mạnh mẽ và API Kotlin trực quan. Đối với ai từng lập trình Flutter hoặc React Native thì sẽ dễ dàng hơn rất nhiều vì ý tưởng của compose cũng dựa trên việc thiết kế UI theo dạng cây.
- JetPack compose mind map
- Thiết lập môi trường phát triển và dùng Compose.
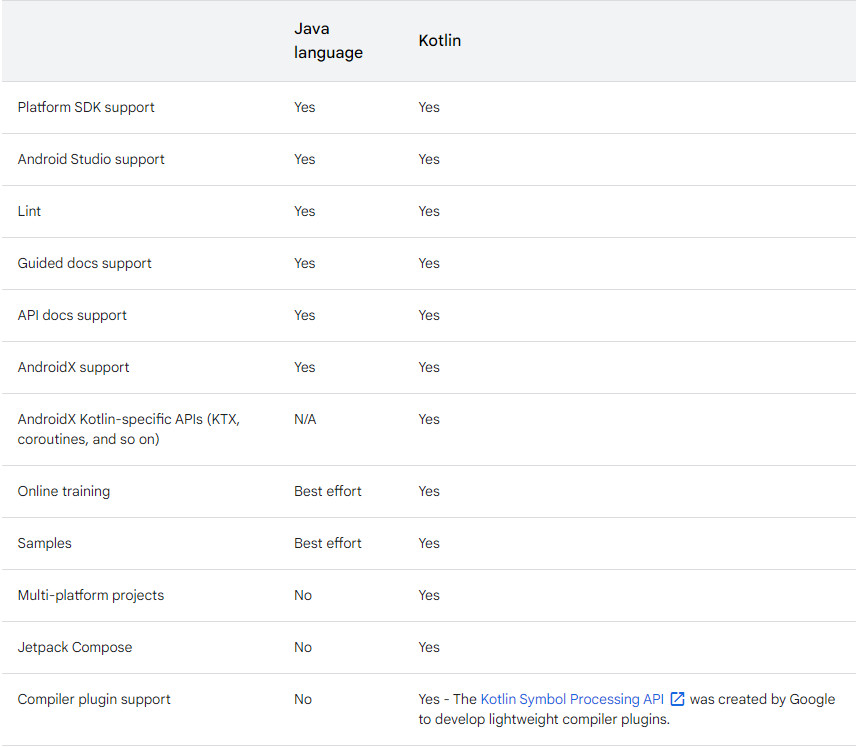
Giải quyết vấn đề với Jetpack Compose
Compose có cơ chế khá giống với các khung UI framework hiện có như React, Litho hoặc Flutter.
UI framework hiện tại của Android đã có từ năm 2008 và theo thời gian, nó đã trở nên phức tạp hơn rất nhiều. Jetpack Compose ra đời nhằm mục đích bắt đầu sự mới mẻ trong việc thiết kế giao diện dựa trên các component. Framework này được viết với các mục tiêu chính:
- Tách biệt khỏi các bản platform release: Điều này cho phép việc sửa lỗi và release sản phẩm nhanh chóng hơn vì nó độc lập với các bản phát hành Android mới.
- Ít các thành phần giao diện hơn: Không bắt buộc bạn phải sử dụng View hay Fragment khi tạo giao diện người dùng của mình. Tất cả mọi thứ là một component và có thể được kết hợp tự do với nhau.
- Làm rõ quyền sở hữu trạng thái (state) và xử lý sự kiện: Một trong những điều quan trọng và phức tạp nhất để có trong các ứng dụng lớn là việc xử lý luồng dữ liệu và trạng thái trong giao diện người dùng của bạn. Compose cho ta biết rõ cái gì đang chịu trách nhiệm về trạng thái và cách xử lý các sự kiện, tương tự như cách React xử lý việc này.
- Viết ít mã hơn: Viết UI trong Android thường yêu cầu RẤT NHIỀU mã, đặc biệt là khi tạo bố cục phức tạp hơn (ví dụ với RecyclerView chẳng hạn). Compose đơn giản hóa đáng kể cách bạn xây dựng giao diện người dùng của mình.
Điều này giúp ta dễ dàng tạo các thành phần biệt lập và có thể tái sử dụng, khiến việc tạo một màn hình mới với các thành phần hiện có trở nên dễ dàng hơn. Giúp bạn có nhiều thời gian hơn tập trung vào việc tạo trải nghiệm người dùng tuyệt vời thay vì cố gắng giữ giữ View hierarchy thật phẳng.
Đặc điểm cơ bản của Jetpack Compose
@Composablelà annotation dùng để đánh dấu một function là compose function.@Modellà annotation được dùng để đánh dấu một class sẽ làm cho ui tương ứng với class đó được cập nhật khi giá trị của model thay đổi.- Luồng của dữ liệu luôn luôn là từ trên xuống dưới. Do đó, trong mô hình MVVM dữ liệu sẽ đi từ Repository -> ViewModel -> Activity và từ Activity thì stateModel được update, từ đó UI được update.
- Để có thể xử lý các sự kiện từ UI như là click button, chúng ta sẽ sử dụng biểu thức lambda để cập nhật Activity mà sự kiện này xảy ra. Từ Activity, luồng sự kiện sẽ là Activity -> ViewModel -> Repository và từ Repository dữ liệu sẽ được gửi trở về bằng luồng đã được nhắc tới ở trên.
- Ứng dụng này chỉ sử dụng cho mục đích demo là chủ yếu, do đó mình sẽ cố gắng sử dụng ít code nhất có thể. Cùng với đó, mình sẽ không sử dụng Repository Pattern mà thay vào đó là dữ liệu tĩnh được khởi tạo trục tiếp từ trong ViewModel.
Jetpack Compose’s tech stack
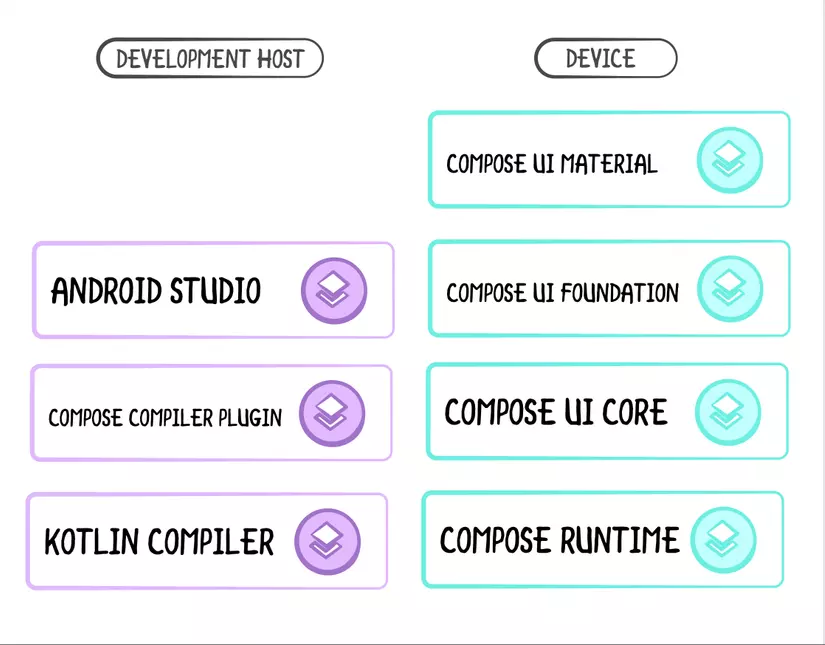
Các thành phần của Jetpack Compose
Jetpack Compose có nhiều thành phần khác nhau và linh hoạt để soạn giao diện người dùng của bạn trên màn hình và trên blog này chúng tôi sẽ khám phá từng thành phần một, vì vậy, không chần chừ gì nữa, hãy chuyển sang phần tiếp theo và bắt đầu khám phá !!!
Lưu ý: Giống như mọi thứ trong Flutter đều là Widget, hầu hết mọi thứ trong Compose đều có thể kết hợp hoặc nằm trong một hàm được chú thích bằng
@Composable. Giống như ví dụ dưới đây:
@Composable
fun YourComposable() {
    //Your implementation on composable or UI components placed together in it.
}
1. Surface
A Surface is anything on which you can place any other components or apply some property on it to give some shape or look.
Surface là bất cứ thứ gì mà bạn có thể đặt bất kỳ thành phần nào khác lên đó hoặc áp dụng một số thuộc tính lên nó để tạo ra một số hình dạng hoặc diện mạo.
@Composable
fun ShowSurfaceSample() {
    Surface(
        modifier = Modifier.padding(8.dp),
        border = BorderStroke(2.dp, Color.Black),
        contentColor = Color.White,
        elevation = 8.dp,
        shape = RoundedCornerShape(10.dp),
        color = Color.DarkGray
    ) {}
}
2. Scaffold
Scaffold is kind of a basic structure that any app can have in general. For example, Toolbar or TopAppBar, Side Drawer, Bottom Navigation Menu, FloatingActionButton, Main Content, etc.
Compose cung cấp các bố cục thuận tiện cho việc kết hợp các thành phần Material vào các mẫu màn hình phổ biến. Các thành phần kết hợp như Scaffold cung cấp các khe cho nhiều loại thành phần và các thành phần màn hình khác.
@Composable
fun ShowScaffoldSample() {
    Surface(modifier = Modifier.padding(20.dp)) {
        Scaffold(
            topBar = {
                TopAppBar(
                    title = { Text(text = "App Toolbar") },
                )
            },
            content = {
                Surface(color = Color.DarkGray, modifier = Modifier.fillMaxSize()) {}
            },
            floatingActionButton = {
                FloatingActionButton(onClick = { someActionOnFabClick() }) {
                    Icon(painter = painterResource(id = R.drawable.sample_image), contentDescription = null)
                }
            }
        )
    }
}
3. TopAppBar
TopAppBar as the name suggests stays at the top of your screen and acts a Toolbar in Android from where you can handle back navigation(s), options menu and things like that.
@Composable
fun TopAppBarWithBackArrow() {
    TopAppBar(
        title = { Text(text = "Toolbar Title") },
        navigationIcon = {
            IconButton(onClick = { goBackToPreviousScreen() }) {
                Icon(
                    Icons.Filled.ArrowBack,
                    contentDescription = null,
                    tint = Color.White
                )
            }
        }
    )
}
4. FloatingActionButton
A FloatingActionButton or FAB acts as the floating button in your screen which you can keep to allow user to perform some quick action or jump into next screen.
@Composable
fun ShowFABSample() {
    Scaffold(
        content = {
            Surface(color = Color.DarkGray, modifier = Modifier.fillMaxSize()) {}
        },
        floatingActionButton = {
            FloatingActionButton(onClick = { toast(mContext, "FAB Clicked") }) {
                Text("Add")
                //or
                Icon(painter = painterResource(id = R.drawable.ic_add_user), contentDescription = null)
            }
        }
    )
}
5. Card
A Card is a that layout which we can use to display a particular part of our screen little bit elevated or with rounded corners mostly we use this to design our list’s single row item.
@Composable
fun ShowCardSample() {
    Card(
        elevation = 5.dp,
        modifier = Modifier
            .padding(5.dp)
            .wrapContentHeight()
    ) {
        Text(text = "Text inside Card", Modifier.padding(15.dp))
    }
}
6. Box
A Box in Compose is a layout which renders its child components stack over each other and provides various properties to align its children according to the requirement. It is similar to Stack in Flutter and FrameLayout in Android XML.
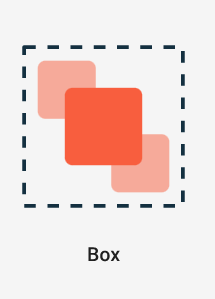
@Composable
fun ShowBoxSample() {
    Box(modifier = Modifier.size(200.dp)) {
        Surface(
            color = Color.Black, modifier = Modifier
                .size(150.dp)
                .align(alignment = Alignment.Center)
        ) {}
        Icon(
            Icons.Filled.CheckCircle,
            contentDescription = null,
            tint = Color.Yellow,
            modifier = Modifier
                .align(alignment = Alignment.Center)
                .size(50.dp)
        )
    }
}
7. Row
A Row places its child components in horizontal manner as the name suggests and similar to LinearLayout with “horizontal” orientation in Android XML.
@Composable
fun ShowRowSample(modifier: Modifier = Modifier) {
    Surface(
            modifier
            .fillMaxWidth()
            .padding(20.dp)
    ) {
        Row {
            Text(text = "Item 1")
            Text(text = "Item 2")
            Text(text = "Item 3")
        }
     }
}
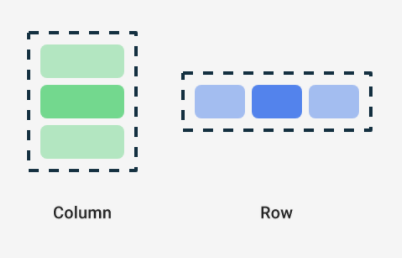
8. Column
A Column places its child components in vertical manner as the name suggests and similar to LinearLayout with “vertical” orientation in Android XML.
@Composable
fun ShowColumnSample(modifier: Modifier = Modifier) {
    Surface(
      modifier.padding(20.dp)) {
        Column {
            Text(text = "Item 1")
            Text(text = "Item 2")
            Text(text = "Item 3")
        }
     }
}
9. Spacer
A Spacer is that component which we can use it for providing space between different components. It is similar to View in Android XML.
@Composable
fun ShowSpacerSample() {
    Column(Modifier.padding(20.dp)) {
        Column {
            Text("Layout with 40 DP height as space between buttons")
            Button(onClick = {}) { Text("Button One") }
            Spacer(Modifier.height(40.dp))
            Button(onClick = {}) { Text("Button Two") }
        }
        Spacer(Modifier.height(40.dp))
        Text("Layout with 40 DP width as space between buttons")
        Row {
            Button(onClick = {}) { Text("Button One") }
            Spacer(Modifier.width(40.dp))
            Button(onClick = {}) { Text("Button Two") }
        }
    }
}
10. Text
A Text is a simple label or text you want to display on screen to portray or convey something.
@Composable
fun ShowTextSample() {
    Text(
        text = "This is the sample to show text in action",
        fontWeight = FontWeight.Bold,
        fontSize = 30.sp,
        fontFamily = FontFamily.Cursive,
        color = Color.Green,
    )
}
11. TextButton
A TextButton is a mix of Text and Button component means it will look like a Text but it can be clickable as well.
@Composable
fun ShowTextButtonSample(modifier: Modifier = Modifier) {
    val mContext = LocalContext.current
    TextButton(
        modifier = modifier
            .padding(20.dp)
            .fillMaxWidth()
            .wrapContentHeight(),
        onClick = { toast(mContext, "You clicked TextButton") }) {
        Text("I'm a Text Button")
    }
}
12. TextField
A TextField in Compose is similar to EditText in Android and it allows user to input some value in it.
@Composable
fun ShowTextFieldSample(modifier: Modifier = Modifier) {
    var basicTextField by remember { mutableStateOf("") }
    var outlinedTextField by remember { mutableStateOf("") }
    var paswword by remember { mutableStateOf("") }

    Column(
        modifier = modifier
            .fillMaxSize()
            .padding(20.dp),
        verticalArrangement = Arrangement.Top
    ) {
        TextField(
            value = basicTextField,
            onValueChange = { basicTextField = it },
            label = { Text("Basic Label") },
            modifier = modifier.fillMaxWidth()
        )
        Spacer(modifier.height(20.dp))
        OutlinedTextField(
            value = outlinedTextField,
            onValueChange = { outlinedTextField = it },
            label = { Text("Outlined Label") },
            modifier = modifier.fillMaxWidth()
        )
        Spacer(modifier.height(20.dp))
        OutlinedTextField(
            value = paswword,
            onValueChange = { paswword = it },
            label = { Text("Password") },
            visualTransformation = PasswordVisualTransformation(),
            keyboardOptions = KeyboardOptions(keyboardType = KeyboardType.Password),
            modifier = modifier.fillMaxWidth()
        )
    }
}
13. Button
A Button in Compose is a way to show an actionable component which can be clicked and can perform some given action.
@Composable
fun ShowButtonSample() {
    val mContext = LocalContext.current
    Column(
        modifier = Modifier
            .padding(20.dp)
            .fillMaxWidth()
    ) {
        Button(onClick = { toast(mContext, "You clicked simple button") }) {
            Text("Button Text")
        }
        Spacer(modifier = Modifier.height(20.dp))
        OutlinedButton(onClick = { toast(mContext, "You clicked outlined button") }) {
            Text("Outlined Button Text")
        }
    }
}
14. Image
An Image in Compose is used to display image or picture from remote URL, drawable, or, app assets. You can use Coil Compose library to display remote image URL in your Image component.
@Composable
fun ShowImageSample() {
    val image: Painter = painterResource(id = R.drawable.sample_image)
    Column(
        modifier = Modifier
            .padding(20.dp)
            .fillMaxSize()
    ) {
        Image(
            painter = image,
            contentDescription = "",
            modifier = Modifier
                .fillMaxWidth()
                .height(200.dp),
            contentScale = ContentScale.Crop
        )
    }
}
15. Icon
An Icon is used to display various different icons to provide some added information about that field or label. You can also wrap Icon under IconButton component to upgrade that icon to make it clickable as well.
@Composable
fun ShowIconSample() {
    val mContext = LocalContext.current
    Column(Modifier.padding(20.dp)) {
        Text("Normal Icon")
        Spacer(modifier = Modifier.height(10.dp))
        Icon(
            Icons.Filled.Face,
            contentDescription = null,
            tint = Color.Black,
            modifier = Modifier
                .size(100.dp)
        )
        Spacer(modifier = Modifier.height(20.dp))
        Text("Icon with clickable action")
        Spacer(modifier = Modifier.height(10.dp))
        IconButton(
            onClick = { toast(mContext, "You clicked IconButton with refresh icon") },
            modifier = Modifier
                .wrapContentSize()
        ) {
            Icon(
                Icons.Filled.Refresh,
                contentDescription = null,
                tint = Color.Black,
                modifier = Modifier
                    .size(100.dp)
            )
        }
    }
}
16. LazyColumn
A LazyColumn represents a list of data displayed in vertical manner and it is similar to RecyclerView with a vertical LinearLayout orientation.
@Composable
fun ShowLazyColumnSample() {
    val list = (1..50).map { it.toString() }
    Column(Modifier.padding(20.dp)) {
        LazyColumn {
            items(list) { item ->
                SampleLazyColumnItem(item)
            }
        }
    }
}

@Composable
fun SampleLazyColumnItem(item: String) {
    Card(
        elevation = 5.dp, modifier = Modifier
            .padding(5.dp)
            .fillMaxWidth()
    ) {
        Text("List Item #$item", modifier = Modifier.padding(10.dp))
    }
}
17. LazyRow
A LazyRow represents a list of data displayed in horizontal manner and it is similar to RecyclerView with a horizontal LinearLayout orientation.
@Composable
fun ShowLazyRowSample() {
    val list = (1..50).map { it.toString() }
    Column(Modifier.padding(20.dp)) {
        LazyRow {
            items(list) { item ->
                SampleLazyRowItem(item)
            }
        }
    }
}

@Composable
fun SampleLazyRowItem(item: String) {
    Card(
        elevation = 5.dp, modifier = Modifier
            .padding(5.dp)
            .wrapContentWidth()
            .wrapContentHeight()
    ) {
        Text("List Item #$item", modifier = Modifier.padding(10.dp), maxLines = 1)
    }
}
18. LazyVerticalGrid
A LazyVerticalGrid represents a grid of data displayed in vertical manner and it is similar to RecyclerView with a vertical GridLayoutManager.
@OptIn(ExperimentalFoundationApi::class)
@Composable
fun ShowLazyVerticalGridSample() {
    val list = (1..50).map { it.toString() }
    Column(Modifier.padding(20.dp)) {
        LazyVerticalGrid(cells = GridCells.Fixed(3), content = {
            items(list) { item ->
                ShowLazyVerticalGridSample(item)
            }
        })
    }
}

@Composable
fun ShowLazyVerticalGridSample() {
    val list = (1..50).map { it.toString() }
    Column(Modifier.padding(20.dp)) {
        LazyRow {
            items(list) { item ->
                SampleLazyRowItem(item)
            }
        }
    }
}
19. AlertDialog
An AlertDialog in Compose serves the similar purpose as in other languages of showing a dialog or popup to the user on performing some action on the app components.
@Composable
fun AlertDialogSample() {
    val showDialog = remember { mutableStateOf(false) }
    if (showDialog.value) {
        ShowAlertDialogSample(
            showDialog = showDialog.value,
            onDismiss = { showDialog.value = false })
    }
    Column(
        verticalArrangement = Arrangement.Center,
        horizontalAlignment = Alignment.CenterHorizontally
    ) {
        Button(
            onClick = {
                showDialog.value = true
            }
        ) {
            Text(
                text = "Show Dialog",
                fontSize = 16.sp,
            )
        }
    }
}

@Composable
fun ShowAlertDialogSample(
    showDialog: Boolean,
    onDismiss: () -> Unit
) {

    if (showDialog) {
        AlertDialog(
            title = {
                Text("Alert Title", style = MaterialTheme.typography.body2)
            },
            text = {
                Text(text = "Are you sure?")
            },
            onDismissRequest = onDismiss,
            confirmButton = {
                TextButton(onClick = onDismiss) {
                    Text("Yes")
                }
            },
            dismissButton = {
                TextButton(onClick = onDismiss) {
                    Text("No")
                }
            }
        )
    }
}
20. CircularProgressIndicator
A CircularProgressIndicator is a component used to show any kind of progress in circular or circle shaped indicator. It can be determinate and indeterminate.
@Composable
fun ShowCircularProgressSample() {
    val progress by remember { mutableStateOf(0.5f) }
    val animatedProgress = animateFloatAsState(
        targetValue = progress,
        animationSpec = ProgressIndicatorDefaults.ProgressAnimationSpec
    ).value

    Column(horizontalAlignment = Alignment.CenterHorizontally) {
        Spacer(Modifier.height(10.dp))
        Text("Indeterminate CircularProgressIndicator")
        CircularProgressIndicator()
        Spacer(Modifier.height(40.dp))
        Text("Determinate CircularProgressIndicator")
        CircularProgressIndicator(progress = animatedProgress)
    }
}
21. LinearProgressIndicator
A LinearProgressIndicator is a component used to show any kind of progress in linear or horizontally placed indicator. It can also be determinate and indeterminate.
@Composable
fun ShowLinearProgressSample() {
    val progress by remember { mutableStateOf(0.5f) }
    val animatedProgress = animateFloatAsState(
        targetValue = progress,
        animationSpec = ProgressIndicatorDefaults.ProgressAnimationSpec
    ).value

    Column(horizontalAlignment = Alignment.CenterHorizontally) {
        Spacer(Modifier.height(10.dp))
        Text("Indeterminate LinearProgressIndicator")
        LinearProgressIndicator()
        Spacer(Modifier.height(30.dp))
        Text("Determinate LinearProgressIndicator")
        LinearProgressIndicator(progress = animatedProgress)
    }
}
22. CheckBox
A Checkbox component in Compose provides functionality of choosing multiple items from given list of items for example selection of hobbies.
@Composable
fun ShowCheckBoxSample() {

    val cricketState = remember { mutableStateOf(false) }
    val hockeyState = remember { mutableStateOf(false) }
    val footballState = remember { mutableStateOf(false) }

    Column(verticalArrangement = Arrangement.Center) {
        Row(
            verticalAlignment = Alignment.CenterVertically,
            modifier = Modifier
                .fillMaxWidth()
                .clickable { cricketState.value = !cricketState.value }) {
            Checkbox(
                checked = cricketState.value,
                onCheckedChange = { cricketState.value = it },
            )
            Text("Cricket")
        }
        Row(verticalAlignment = Alignment.CenterVertically,
            modifier = Modifier
                .fillMaxWidth()
                .clickable { hockeyState.value = !hockeyState.value }) {
            Checkbox(
                checked = hockeyState.value,
                onCheckedChange = { hockeyState.value = it },
            )
            Text("Hockey")
        }
        Row(verticalAlignment = Alignment.CenterVertically,
            modifier = Modifier
                .fillMaxWidth()
                .clickable { footballState.value = !footballState.value }) {
            Checkbox(
                checked = footballState.value,
                onCheckedChange = { footballState.value = it },
            )
            Text("Football")
        }

    }
}
23. RadioButton
A RadioButton component in Compose provides functionality of choosing single item from given list of items for example selection of gender.
@Composable
fun ShowRadioButtonSample() {
    val genderRadioOptions = listOf("Male", "Female", "Transgender")
    val (selectedOption, onOptionSelected) = remember { mutableStateOf(genderRadioOptions[1]) }
    Column(verticalArrangement = Arrangement.Center) {
        genderRadioOptions.forEach { text ->
            Row(
                Modifier
                    .fillMaxWidth()
                    .selectable(
                        selected = (text == selectedOption),
                        onClick = {
                            onOptionSelected(text)
                        }
                    )
                    .padding(horizontal = 16.dp),
                verticalAlignment = Alignment.CenterVertically
            ) {
                RadioButton(
                    selected = (text == selectedOption),
                    onClick = { onOptionSelected(text) }
                )
                Text(
                    text = text,
                    modifier = Modifier.padding(start = 16.dp)
                )
            }
        }
    }
}
24. Slider
A Slider component in Compose provides functionality of choosing some value by sliding through one horizontal slider for example choosing price from low to high.
@Composable
fun ShowSliderSample() {
    var sliderPosition by remember { mutableStateOf(0f) }
    Column(verticalArrangement = Arrangement.Center) {
        Text(text = "Slider Value - $sliderPosition")
        Slider(value = sliderPosition, onValueChange = { sliderPosition = it })
    }
}
25. Switch
A Switch component in Compose provides functionality of choosing from two possible options for example enable push notifications or not.
@Composable
fun ShowSwitchSample() {
    val checkedState = remember { mutableStateOf(true) }
    Row(
        horizontalArrangement = Arrangement.SpaceBetween,
        verticalAlignment = Alignment.CenterVertically,
        modifier = Modifier.padding(20.dp)
    ) {
        Text("Enable Switch")
        Switch(
            checked = checkedState.value,
            onCheckedChange = { checkedState.value = it }
        )
    }
}
26. SnackBar
A SnackBar component in Compose provides functionality of showing a minimal popup kind of layout for temporary basis to convey some information to the user like showing — Your post is updated !!!
@Composable
fun ShowSnackBarSample() {

    val (snackBarVisibleState, setSnackBarState) = remember { mutableStateOf(false) }

    Box(modifier = Modifier.fillMaxSize()) {
        Button(
            onClick = { setSnackBarState(!snackBarVisibleState) },
            modifier = Modifier.align(Alignment.Center)
        ) {
            if (snackBarVisibleState) {
                Text("Hide SnackBar")
            } else {
                Text("Show SnackBar")
            }
        }
        if (snackBarVisibleState) {
            Snackbar(
                action = {
                    Button(onClick = {}) {
                        Text("MyAction")
                    }
                },
                modifier = Modifier
                    .padding(8.dp)
                    .align(Alignment.BottomCenter)
            ) { Text(text = "This is a SnackBar!") }
        }
    }
}
27. Divider
A Divider component in Compose provides functionality of showing a horizontal or vertical line in between some components in your screen to convey some partition or difference.
@Composable
fun ShowDividerSample() {
    Column(modifier = Modifier.padding(20.dp)) {
        Text("Profile")
        Spacer(Modifier.height(10.dp))
        Divider(startIndent = 0.dp, thickness = 2.dp, color = Color.DarkGray)
        Spacer(Modifier.height(10.dp))
        Text("Account")
        Spacer(Modifier.height(10.dp))
        Divider(startIndent = 0.dp, thickness = 2.dp, color = Color.DarkGray)
        Spacer(Modifier.height(10.dp))
        Text("Settings")
    }
}
28. DropDownMenu
A DropDownMenu component in Compose provides functionality of choosing single item from list of related items like choosing profession from dropdown menu.
@Composable
fun ShowDropDownSample() {
    var expanded by remember { mutableStateOf(false) }
    val items = listOf("HR", "Marketing", "Accounts", "Development", "Sales", "Management")
    var selectedIndex by remember { mutableStateOf(0) }
    Box(
        modifier = Modifier
            .fillMaxSize()
            .wrapContentSize(Alignment.TopStart)
            .padding(20.dp)
    ) {
        Text(
            items[selectedIndex],
            modifier = Modifier
                .fillMaxWidth()
                .clickable(onClick = { expanded = true })
                .background(
                    Color.White
                ),
            color = Color.Black
        )
        DropdownMenu(
            expanded = expanded,
            onDismissRequest = { expanded = false },
            modifier = Modifier
                .fillMaxWidth()
                .padding(20.dp)
                .background(
                    Color.White
                )
        ) {
            items.forEachIndexed { index, s ->
                DropdownMenuItem(onClick = {
                    selectedIndex = index
                    expanded = false
                }, contentPadding = PaddingValues(10.dp)) {
                    Text(text = s, color = Color.Black)
                }
            }
        }
    }
}
1. Modifiers
Modifiers in Compose provides us the functionalities or properties through which we can change the layout of our composables or set some intrinsic values like height, width, size, or, padding apart from any composable’s default properties.
Friendly Note: The ordering of properties in modifier matters, it can change the whole complexion of the composable. Try to experiment and explore it yourself.
@Composable
fun ShowScrollableSample(modifier: Modifier = Modifier) {
    //To make your Column scrollable
    Column(modifier.verticalScroll(rememberScrollState())) {
        //Child Components in Column
    }
}

@Composable
fun ShowClickableSample(modifier: Modifier = Modifier) {
    //To make your Column or any composable clickable
    Row(modifier.clickable { onColumnClicked() }) {
        //Child Components in Row
    }
}

@Composable
fun ShowPaddingSample(modifier: Modifier = Modifier) {
    //To provide padding to your composables
    Box(modifier.padding(all = 20.dp)) {
        //Child Components in Box
    }
    Box(modifier.padding(start = 10.dp, top = 10.dp, end = 10.dp, bottom = 10.dp)) {
        //Child Components in Box
    }
    Box(modifier.padding(horizontal = 10.dp, vertical = 10.dp)) {
        //Child Components in Box
    }
}

@Composable
fun ShowFillOrWrapSample(modifier: Modifier = Modifier) {
    //To fill or wrap your composable to content or device width and height
    Surface(
        modifier
            .fillMaxWidth()
            .fillMaxHeight()
    ) {
        Column(
            modifier
                .wrapContentWidth()
                .wrapContentHeight()
        ) {

        }
    }
}

@Composable
fun ShowHeightWidthSizeSample(modifier: Modifier = Modifier) {
    //To apply height, width, or size to your composables
    Box(
        modifier
            .height(100.dp)
            .width(200.dp)){
        Icon(
            painterResource(id = R.drawable.sample_image),
            contentDescription = "sample icon",
            modifier.size(100.dp),
        )
    }
}
2. remember
remember in Compose is mainly used to perform local state management means to preserve values in the screen while user is interacting with those values. It can used to perform operations like tracking textfield while user types in it, or showing alert dialog on some button click, etc.
@Composable
fun ShowRememberSampleWithTextField(modifier: Modifier = Modifier) {

    var basicTextField by remember { mutableStateOf("") }

    Column(
        modifier = modifier
            .fillMaxSize()
            .padding(20.dp),
        verticalArrangement = Arrangement.Top
    ) {
        TextField(
            value = basicTextField,
            onValueChange = { basicTextField = it },
            label = { Text("Basic Label") },
            modifier = modifier.fillMaxWidth()
        )
    }

}
3. rememberSaveable
rememberSaveable in Compose is almost similar to remember we learnt but if you observe properly your values will not be retained after screen rotation or any configuration changed when using remember and that is why we have rememberSaveable which will retain the values every time whatever the scenario.
Friendly Note: Try to rotate the screen and observe revenue variable is retaining the current revenue and not vanishing to 0 again on configuration change.
@Composable
fun ShowRememberSaveableSample(modifier: Modifier = Modifier) {

    var revenue by rememberSaveable { mutableStateOf(0) }

    Column {

        Button(onClick = { revenue += 1000 }) {
            Text("Increase Revenue")
        }
        Spacer(modifier.height(20.dp))
        Text("Current Revenue = Rs.$revenue")

    }

}
4. animateContentSize
Animations are the fun part and of course Compose provides it too. But one of my favorite animation provided by Compose is animateContentSize and the beauty of this animation is how smoothly it gives the transition when size changes in any composable.
And fun fact is it comes as a simple property in our beloved Modifiers. You just have to append this in your modifier property and provide some animation values. Thats it.
@Composable
fun ShowAnimateContentSizeSample(modifier: Modifier = Modifier) {

    var expanded by remember { mutableStateOf(false) }

    Column(
        modifier = Modifier
            .padding(20.dp)
            .clickable {
                expanded = !expanded
            }
            .animateContentSize(
                animationSpec = spring(
                    dampingRatio = Spring.DampingRatioMediumBouncy,
                    stiffness = Spring.StiffnessLow
                )
            )
    ) {
        Text("Text which is showing all the time")
        Spacer(modifier.height(20.dp))
        if (expanded) {
            Text("Some text to show or hide with animation as the column is clicked")
        }
    }

}
5. Shape
We all love to shape our components in our UIs. Thus Compose also gives us the handy shapes to work out and upgrade our boring existing composables into rectangle, circle, rounded rectangle, or, cut corner shapes.
Friendly Note: You can’t just provide shapes to your composables using clip property in modifier but you have to just check whether any component provide “shape” property in their methods or not and if you found “shape” in it you can directly give any shape like we gave in clip property.
@Composable
fun ShowShapesSample(modifier: Modifier = Modifier) {

    Column(modifier = Modifier
        .fillMaxWidth()
        .wrapContentSize(Alignment.Center)) {
        Box(
            modifier = Modifier
                .size(100.dp)
                .clip(RectangleShape)
                .background(Color.Green)
        )
        Spacer(modifier.height(20.dp))
        Box(
            modifier = Modifier
                .size(100.dp)
                .clip(CircleShape)
                .background(Color.Green)
        )
        Spacer(modifier.height(20.dp))
        Box(
            modifier = Modifier
                .size(100.dp)
                .clip(RoundedCornerShape(20.dp))
                .background(Color.Green)
        )
        Spacer(modifier.height(20.dp))
        Box(
            modifier = Modifier
                .size(100.dp)
                .clip(CutCornerShape(20.dp))
                .background(Color.Green)
        )
    }

}
Live Preview
Live Preview là một tính năng của ANdorid Studio cho phép bạn kiểm tra và so sánh các composable functions thông qua orientation, kích thước font và theme mà không cần phải deploy lại ứng dụng.
Để tạo một live preview, tạo mới một composable function không có tham số bao gồm annotation @Preview ở bên trên annotation @Composable`:
Jetpack Compose là bộ công cụ hiện đại được Android khuyên dùng để xây dựng giao diện người dùng gốc. Nó đủ trưởng thành và cho phép bạn xây dựng giao diện người dùng dễ dàng hơn, nhanh hơn và ít mã hơn. Hơn nữa, bố cục XML dựa trên Soạn thảo và Chế độ xem có thể được kết hợp. Bạn có thể thêm giao diện người dùng Compose vào một ứng dụng hiện có sử dụng thiết kế dựa trên Chế độ xem hoặc bao gồm hệ phân cấp Chế độ xem Android trong giao diện người dùng Compose. Cách tiếp cận này đặc biệt hữu ích nếu bạn muốn sử dụng các thành phần giao diện người dùng chưa có trong Compose, như AdView hoặc MediaPlayer. Khi bạn bắt đầu một dự án mới, không có lý do gì để sử dụng bố cục XML nữa.
Example App
Tôi đang làm việc trong một dự án nguồn mở nhỏ nơi tôi sẽ triển khai các phương pháp hay nhất đã đề cập.
Bạn có thể tìm thấy nó ở đây: https://github.com/jurajkusnier/stock-browser
Bản thân ứng dụng này rất đơn giản. Nó tải dữ liệu thị trường từ nhiều API của bên thứ 3 và lưu trữ chúng trong cơ sở dữ liệu cục bộ. Sau đó nó cho phép người dùng tìm kiếm, duyệt và đánh dấu các mục yêu thích.
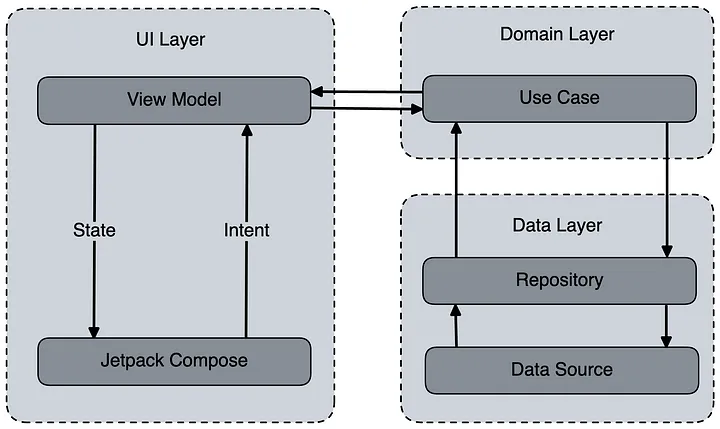
Ứng dụng sử dụng mẫu kiến trúc MVI (Model View Intent), được triển khai bằng thư viện Orbit-MVI. Mỗi màn hình có ViewModel và ScreenState phù hợp. ViewModel đại diện cho nguồn gốc của màn hình. Nó xử lý tất cả thông tin đầu vào của người dùng và trả về trạng thái giao diện người dùng tương ứng được hiển thị trên màn hình. Ngoài trạng thái, ViewModel còn có thể tạo ra các tác dụng phụ được sử dụng chủ yếu để điều hướng giữa các màn hình. ViewModel gọi các trường hợp sử dụng khác nhau để hiển thị dữ liệu cho người dùng. Logic để tải và lưu dữ liệu từ các tài nguyên khác nhau được thực hiện bởi các kho lưu trữ và nguồn dữ liệu.
Free Resources
Tôi thực sự khuyên bạn nên xem khóa học miễn phí này của Google về Phát triển ứng dụng Android bằng Kotlin. Bạn cũng có thể bắt đầu với khóa học miễn phí này trên trang dành cho nhà phát triển Android, nơi các khái niệm được giảng dạy với sự trợ giúp của các phòng thí nghiệm mã, dự án và câu đố, đồng thời bạn cũng kiếm được huy hiệu khi biết các khái niệm đó xuất hiện trên hồ sơ nhà phát triển Google của mình. Ngoài ra, đây là một số tài nguyên để tìm hiểu thêm về các chủ đề được liệt kê ở trên.
- Udacity - Phát triển ứng dụng Android với Kotlin
- Kiến thức cơ bản về Android trong Kotlin
- Hướng dẫn dành cho nhà phát triển Android
- Kodeco
- How to Build an Android App in 2023
Training courses
For beginners
For experienced Android developers
- Jetpack Compose for Android developers
- Modern Android app architecture
- Make your Android app more accessible
- Use coroutines in common Android use cases
Kotlin language training
Ứng dụng được xây dựng bằng Compose

Tổng kết
Jetpack Compose là tương lai mà các lập trình viên Android cần thiết để xây dựng UI cho ứng dụng của mình một cách nhanh chóng và trực quan hơn. Không những thế nó còn loại bỏ được những khó khăn trong việc kiến trúc một ứng dụng Android.
Tham khảo
- Complete Jetpack Compose Tutorial For Beginners
- The Journey of Jetpack 🚀 — Compose
- Tips for working with Preview in Jetpack Compose
- Jetpack Compose 1.4 Essentials: Developing Android Apps with Jetpack Compose 1.4, Android Studio, and Kotlin
- Jetpack Compose by Tutorials (Second Edition): Building Beautiful UI With Jetpack Compose
- Cheat sheet for Jetpack Compose
- The Ultimate Jetpack Compose Cheat Sheet
- Jetpack Compose Cheat Sheet: Part One
- Jetpack Compose Cheat Sheet: Part Two
- Jetpack Compose Cheat Sheet: Part Three
- Jetpack Compose Cheat Sheet: Part Four
- Animation cheat sheet
- Testing cheatsheet
- JetpackComposeVersion.com
- Why Not Compose!
- MDC for Android
- 25 Videos - Jetpack Compose
- 35 Videos - Jetpack Compose
- 93 Videos - Jetpack Compose
- Android - Jetpack Compose
- Cơ bản về Jetpack Compose
- Jetpack Compose - UI Framework mới của Android
- Sử dụng Jetpack Compose để dựng UI trong Android
- Sử dụng Jetpack Compose cho project Android với mô hình MVVM
- Jetpack Compose With MVVM
- Jetpack Compose cho người mới bắt đầu
- Jetpack Compose Tutorial - Step by Step Guide
- Jetpack Compose Tutorial - Step by Step Guide
- https://github.com/MindorksOpenSource/Jetpack-Compose-Android-Examples
- Tản mạn về Jetpack Compose - Phần I
- Tản mạn về Jetpack Compose - Phần II
- Material theme trong jetpack compose
- Navigation in Jetpack Compose
- Codelabs - Navigate between screens with Compose
- Effortless Navigation with Compose
- Full Guide to Nested Navigation Graphs in Jetpack Compose
- Modular Navigation with Jetpack Compose
- Nested Navigation Graph in Jetpack Compose with Bottom Navigation
- Migrate Jetpack Navigation to Navigation Compose
Truyền navController dưới dạng tham số cho từng compose
- Developing Android App in 2023
- Introduction to Android Jetpack
- Android Jetpack Compose – Interoperability Using Compose in XML Layouts
- Architecture Components in Android Jetpack
- Android Jetpack là gì? Tại sao bạn nên biết
- Thông Thạo Jetpack – Phần 1 – Jetpack Là Gì?
- Thông Thạo Jetpack – Phần 2 – Android KTX
- Android Architecture Component
- Modern Android Architectures – MVC/MVP/MVVM – Phần 1: Giới Thiệu Các Mô Hình Kiến Trúc
- Modern Android Architectures – MVC/MVP/MVVM – Phần 2: Kiến Trúc MVC
- Modern Android Architectures – MVC/MVP/MVVM – Phần 3: Kiến Trúc MVP
- Cơ Bản – Bài Học Theo Chương Trình (36B)
- Phát triển ứng dụng Android - 34 điều tôi đã rút ra được kinh nghiệm
- Android Adaptive Launcher Icon – Tất Cả Thông Tin Bạn Cần Biết